
Extended Validation (EV) Code Signing Certificates with Azure Key Vault and digicert
In a previous post, I showed you how to Setup Code Signing Certificates in Azure Key Vault. In this post, I will show you how to create an Extended Validation (EV) Code Signing Certificate with digicert and store it in Azure Key Vault.
Prerequisites
For this to work, you will need the following:
- Azure Subscription
- Azure Key Vault Premium SKU
- digicert Account
- digicert EV Code Signing Certificate
- An organization that has been validated for EV Code Signing Certificates with digicert
Background
What is a code signing certificate you ask? I’m glad you asked! According to digicert code signing certificates are used by software developers to digitally sign apps, drivers, and software programs as a way for end-users to verify that the code they receive has not been altered or compromised by a third party. They include your signature, your company’s name, and if desired, a timestamp.
Essentially, they are a way to validate that source code, packages, executables, etc., comes from who it says it’s from, similarly to how certificates on a web site authenticate the web site when you go to HTTPS enabled web site.
EV Code Signing Certificates combine all the benefits of regular code signing plus additional features including:
- Company address and organization type displayed in the certificate
- Time stamping, signature does not expire once certificate expires
- Certificate stored on a hardware token for two-factor authentication
You can purchase a code signing certificate from a few different sources like digicert, who I have my code certificate from. Please note, they can be expensive for an individual.
Creating a Azure Key Vault
If have an Azure Key Vault Premium SKU, you can skip this step and move to Generate the Certificate Signing Request (CSR) in Azure Key Vault.
If you do not have one, you will need to create one. Here are the steps to create one.
- Sign in to the Azure Portal
- Click Create a Resource
- In the *Search service and marketplace’ text box, type
Key Vaultand hit ‘Enter’ - Click Create on the Key Vault item, then Create again.

Key Vault Creation
You’ll be presented with the ‘Create key vault’ wizard. For the most part, you can leave all of the defaults.

If you want to follow along, here are the settings I used.
| Setting | Value | Comments |
|---|---|---|
| Subscription | my subscription | |
| Resource Group | Presentations |
I put all of my presentation and blog resources in this one group |
| Key Vault Name | Code-Signing-Demo-Vault |
Note: This must be unique |
| Region | (US) West US 2 |
You should choose a region close to your resources |
| Pricing tier | Premium (includes support for HSM backed keys | Premium is required to manage the key |
Note: You will need to have the Premium SKU to store the EV Code Signing Certificate in Azure Key Vault and the HSM encryption key
The rest are defaults.
Click Review + Create
If you did everything correctly, you will get a Validation passed. Validation feels good, doesn’t it!
Click Create
After a few moments, the vault will be created and you will have a page similar to this. I blurred out the secret stuff.

Click on Go to resource
Now that you have a Key Vault that is capable of storing the EV Code Signing Certificate, you can move on to the next step.
Generate the Certificate Signing Request (CSR) in Azure Key Vault
The next step is to generate the Certificate Signing Request (CSR) in Azure Key Vault. This is the request that you will send to digicert to create the EV Code Signing Certificate. Here are the steps to generate the CSR.
- Click Objects in the left-hand menu
- Click Certificates
- Click +Generate/Import
Certification Creation Permissions Required
If you see a message stating that “The operation is not allowed by RBAC…’ you will need to grant yourself the correct permissions.

You need the role of Key Vault Certificates Officer. You can do this by following these steps:
- Click on the Access Control (IAM) in the left-hand menu
- Click on the + Add, then choose Role Assignment
- Click on Key Vault Certificates Officer
- Click Next
- Click on Select members and choose your account, it should be first.
- Click Select
- Click Review + Assign
- Click Review + Assign again.
Now you can go back to the Objects -> Certificates -> +Generate/Import.
Generate the CSR
Now that you are at the Generate/Import page, you can generate the CSR.
Enter/Select the following values:
| Field | Value | Comments |
| Method of Certificate Creation | Generate | |
| Certificate Name | CodeSigning-2024 |
This is the name of the certificate in the Key Vault. NOTE: I append a year to the certificate name since they expire, typically in a year, but this is not required |
| Type of Certificate Authority (CA) | ‘Certificate issued by a non-integrated CA’ | If you have an integrated CA, you can chose that, I don’t know if the rest of the process would be the same |
| Subject | CN=YourDomain.Com, O=YourCompanyName, L=YourCity, S=YourState, C=YourCountry |
This is the subject of the certificate. You can change this to your information. Note: See notes after this table for more details around the subject |
| DNS Names | Left blank | This is for a SAN certificate, which is not needed for a code signing certificate |
| Validity Period (in months) | 12 | This is the number of months the certificate is valid for. You can change this to a different number if you want depending on what your CA supports |
| Content Type | PKCS#12 | This is the format of the certificate. You can use PKCS#12 or PEM. I use PKCS#12 since it is a binary format and can be used in Windows easily |
| Lifetime Action Type | Choice is yours | This is when Azure Key Vault will notify you that the certificate is about to expire. You can choose a number of days before or a percentage of the overall time. The next option will allow you to chose a number of days or percentage |
Subject Comments
| Field | Value | Comments |
|---|---|---|
| CN | YourDomain.Com | This is the common name of the certificate. This should be the domain of the certificate. If you are using it for code signing, you can use the domain of your company or your personal domain |
| O | YourCompanyName | This is the organization name. This should be the name of your company or organization |
| L | YourCity | This is the city where your company is located |
| S | YourState | This is the state where your company is located |
| C | YourCountry | This is the country where your company is located. This should be the two-letter country code |
If any of the values have spaces, you will need to wrap the value in double quotes. For example, if you are in New York City, you would use L="New York City".
Before you click Create, you will need to click on Not configured next to Advanced Policy Configuration and enter the following values:
Advanced Policy Configuration
The Advanced Policy Configuration is where you can set the permissions for the certificate. You can set the permissions for the certificate to be used for code signing, encryption, etc. Here are the values I used for the certificate.
| Field | Value | Comments |
| Extended Key Usages (EKUs) | 1.3.6.1.5.5.7.3.1, 1.3.6.1.4.1.311.10.3.13 |
This is the list of EKUs that the certificate will be used for. The first value is SSL/TLS Web Server Authentication and the second is Code Signing. You can add more EKUs if you need to |
| X.509 Key Usage Flags | DigitalSignature, KeyEncipherment |
This is the list of key usage flags. This is a comma-separated list of the key usage flags. The values are DigitalSignature, NonRepudiation, KeyEncipherment, DataEncipherment, KeyAgreement, CertificateSigning, CRLSigning, EncipherOnly, and DecipherOnly. You can add more flags if you need to |
| Reuse Key on Renewal | No | This is whether the key should be reused when the certificate is renewed. I chose No since I want a new key when the certificate is renewed |
| Exportable Private Key | No | This is whether the private key can be exported. I chose No since I don’t want the private key to be exported |
| Key Type | RSA-HSM | This is the type of key to use. Code Signing certificates need to be backed by an HSM |
| Key Size | 4096 | This is the size of the key. I chose 4096 since it is the most secure |
| Enable Certificate Transparency | No | This is whether the certificate should be logged in a certificate transparency log. I chose No since I don’t need it |
| Certificate Type | leave blank | This is the type of certificate. I left it blank since I don’t need to specify a type |
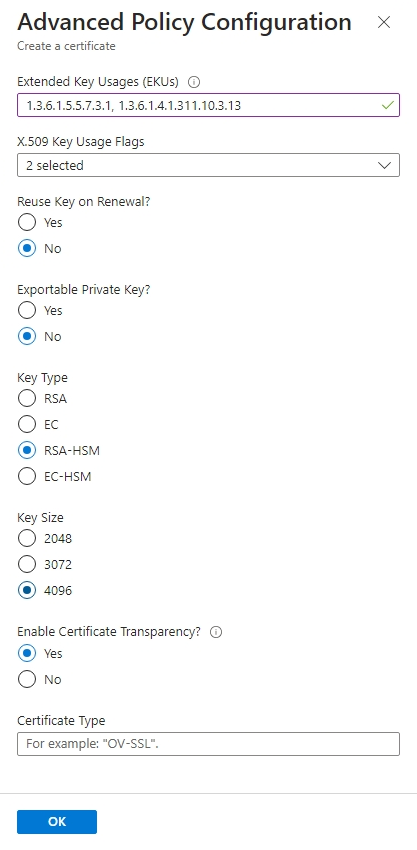
- Click OK to save the Advanced Policy Configuration.
- Click Create to generate the CSR.
At this point, the CSR will be generated. You will need to download the CSR and send it to digicert to create the EV Code Signing Certificate. Click the following prompt in the portal

This will take you to a blade that will allow you to download the CSR which will be required by digicert to create the EV Code Signing Certificate.
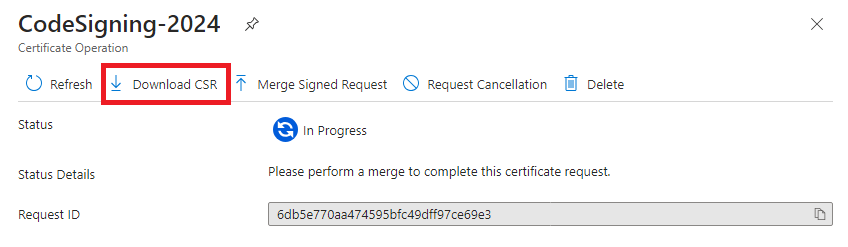
- Click on Download CSR to download the CSR.
- Save the file to a location on your computer.
The default filename should be something like <certificate-name>_<guid>.csr. You can rename the file to something more meaningful if you want but you will only use the file in the next step and then it can be deleted.
Create an EV Code Signing Certificate
Login to your digicert account and follow the steps to create a new certificate.
From the Dashboard, click on the Request a Certificate button and choose EV Code Signing Certificate.

Certificate Information
| Field | Value | Comments |
| Validity period (optional) | 1 year |
This is the validity period of the certificate. For simplicity, it should match what you chose in the certificate creation for Azure Key Vault |
| Auto-renew | your choice | This is whether the certificate should be automatically renewed. I left it unchecked since I rotate the keys and certificates |
Click the Add Organization button to add your organization information. This will be the information that is displayed in the certificate. Only organizations that have been validated for EV Code Signing Certificates can be used. For more on this, see the digicert EV Code Signing Certificate page.
The additional emails are for the certificate notifications. You can add more emails if you want to be notified when the certificate is about to expire, etc.
For the Provisioning options, select Install on an HSM. Once you select that option, you will asked Was the private key generated by a Common Criteria EAL4+ standard or FIPS 140-2 level 2 HSM?. You can chose Yes because Azure Key Vault is FIPS 140-2 level 2 compliant. After you selected Yes, you can upload the CSR that you downloaded from Azure Key Vault or paste the contents of the CSR into the text box.

Click Submit Request
After you pay for the certificate, you will be brought to a page that indicates that you successfully requested the certificate. This all assumes, that your organization was already validated for EV Code Signing Certificates. If not, you will need to go through the validation process.
You’ll also notice on this page, that you will have to sign a HSM Private key agreement.
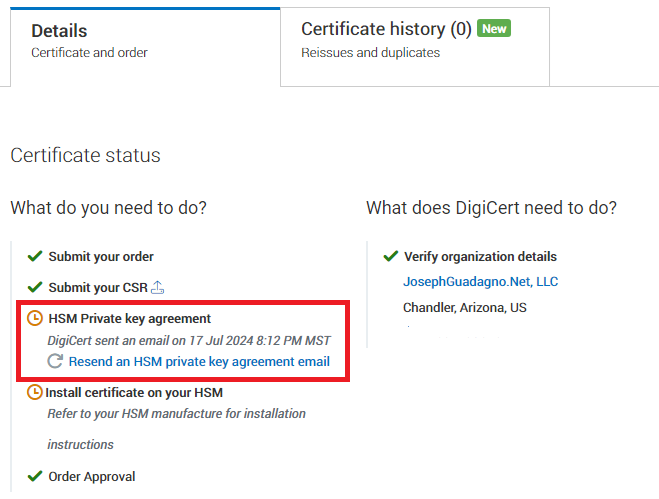
At this point, you, or someone in your organization, will receive and email from digicert with the title [Action Required] Private key protection requirements for digicert Order.
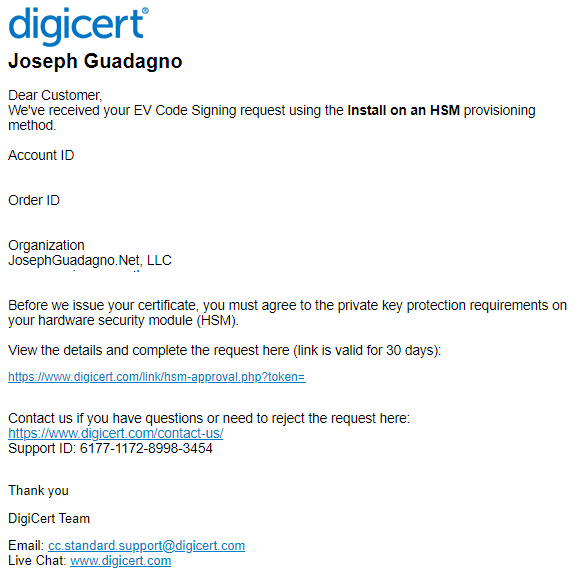
After you agree to the terms, digicert will create the certificate and send you an email with the certificate, this can take some time. After you receive the email, go back to the digicert portal order page and click on the new order.
Click on the Download certificates as button and chose Best format for FIPS 140-2 Level 2 or Common Criteria EAL4+. This will download a zip file with the certificate in the correct format for Azure Key Vault.
Extract the downloaded zip file to a location on your computer.
Import the EV Code Signing Certificate into Azure Key Vault
Navigate back to the Azure Key Vault in the Azure Portal where you generated the request.
- Click on the Objects -> Certificates -> certificate-name. This will bring you to the certificate blade.
- Click on the Certificate Operation button on top.
- Click on Merged Signed Request.
- Select the certificate for your organization from the extracted zip file. It should be
<your_organization>.crt. In my case, the file name isjosephguadagno_net_llc.crt.
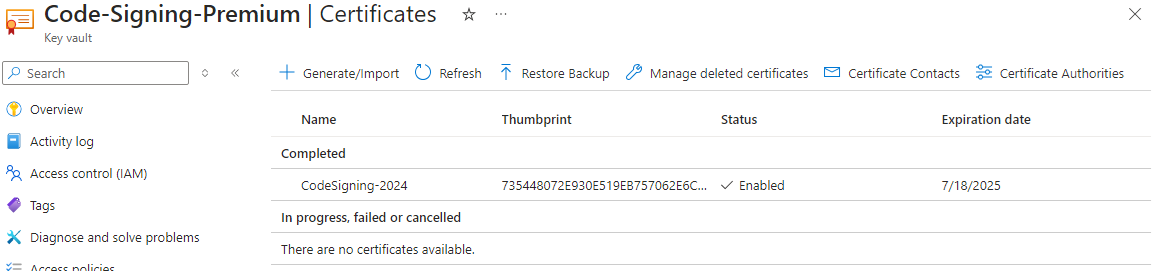
If successful, you will see a Completed status on the certificate operation. If you close this blade, you will notice that the certificate is now enabled with an activation date and expiration date. If you navigate back to the Certificates blade, you will see the certificate listed in the completed state.
Wrap Up
In this post, you learned how to create an Extended Validation (EV) Code Signing Certificate with digicert and store it in Azure Key Vault.
If you want to learn how to use the certificate to sign your a NuGet package from an Azure DevOps pipeline, check out the post Build, Sign, and Deploy NuGet Packages with Azure Pipeline.
Reference
Share on
Bluesky Facebook LinkedIn Reddit XLike what you read?
Please consider sponsoring this blog.

