
Power Prompt with Windows Terminal and Oh My Posh
In this post, I’ll show you how you can “power-up” your PowerShell shell prompt terminal window with Windows Terminal, PowerShell Core, and Oh-My-Posh to improve your day to day command line activity.
Getting Started
Install Windows Terminal
If you don’t have Windows Terminal installed, you can download it from the Microsoft Store (recommended by Microsoft), or you can download it from the Windows Terminal GitHub repository.
Another option is to install it using the Windows Package Manager.
1

winget install --id Microsoft.WindowsTerminal --exact
Install PowerShell
You can install PowerShell using the Windows Package Manager.
1

winget install --id Microsoft.PowerShell --source winget
If you want, you can install the latest preview version of PowerShell with the following command.
1

winget install --id Microsoft.PowerShell.Preview --source winget
Install Oh-My-Posh
Oh-My-Posh is a prompt theming engine for PowerShell. You can install it using the Windows Package Manager with the following command.
1

winget install --id JanDeDobbeleer.OhMyPosh --exact
Installing with UniGetUI
If you are using UniGetUI, which I highly recommend, you can install all three packages as a bundle.
- Save this json locally on your machine.
- In UniGetUI, click on Package Bundles
- Click on Open existing bundle, select the recently saved json file.
- Click on Install selection
1
2
3
4
5
6
7
8
9
10
11
12
13
14
15
16
17
18
19
20
21
22
23
24
25
26
27
28
29
30
31
32
33
34
35
36
37
38
39
40
41
42
43
44
45
46
47
48
49
50
51
52
53
54
55
56
57
58
59
60
61
62
63
64
65
66
67
68
69
70
71
72
73

{
  "export_version": 2,
  "packages": [
    {
      "Id": "JanDeDobbeleer.OhMyPosh",
      "Name": "Oh My Posh",
      "Version": "23.0.2",
      "Source": "winget",
      "ManagerName": "Winget",
      "InstallationOptions": {
        "SkipHashCheck": false,
        "InteractiveInstallation": false,
        "RunAsAdministrator": false,
        "Architecture": "",
        "InstallationScope": "",
        "CustomParameters": [],
        "PreRelease": false,
        "CustomInstallLocation": "",
        "Version": ""
      },
      "Updates": {
        "UpdatesIgnored": false,
        "IgnoredVersion": ""
      }
    },
    {
      "Id": "Microsoft.PowerShell",
      "Name": "PowerShell",
      "Version": "7.4.4.0",
      "Source": "winget",
      "ManagerName": "Winget",
      "InstallationOptions": {
        "SkipHashCheck": false,
        "InteractiveInstallation": false,
        "RunAsAdministrator": false,
        "Architecture": "",
        "InstallationScope": "",
        "CustomParameters": [],
        "PreRelease": false,
        "CustomInstallLocation": "",
        "Version": ""
      },
      "Updates": {
        "UpdatesIgnored": false,
        "IgnoredVersion": ""
      }
    },
    {
      "Id": "Microsoft.WindowsTerminal",
      "Name": "Windows Terminal",
      "Version": "1.20.11781.0",
      "Source": "winget",
      "ManagerName": "Winget",
      "InstallationOptions": {
        "SkipHashCheck": false,
        "InteractiveInstallation": false,
        "RunAsAdministrator": false,
        "Architecture": "",
        "InstallationScope": "",
        "CustomParameters": [],
        "PreRelease": false,
        "CustomInstallLocation": "",
        "Version": ""
      },
      "Updates": {
        "UpdatesIgnored": false,
        "IgnoredVersion": "1.19.10573.0"
      }
    }
  ],
  "incompatible_packages_info": "Incompatible packages cannot be installed from WingetUI, but they have been listed here for logging purposes.",
  "incompatible_packages": []
}
Getting Started with Oh-My-Posh
Oh-My-Posh allows you to customize your prompts with different themes and segments. A sample prompt looks like this.

If you just installed, Windows Terminal, Powershell, or Oh-My-Posh, I recommend you restart your terminal so that oh-my-posh is included in the path.
Font Installation
After restarting your terminal, you can install a font. You’ll typically want to install a Nerd Font, which includes the icons used in the prompt. Run the following command to install the Meslo LGM NF font.
1

oh-my-posh font install meslo
Register the font with Windows Terminal
You will need to tell Windows Terminal to use this font. To do this, open up the Settings in Windows Terminal (CTRL+,)
- Click on the Defaults profile.
- Under the Additional settings section, click Appearance
- Under the Fonts section, select the
MesloLGM Nerd Fontfont for the Font face property, or whatever font you installed.
You can also do this by editing the Windows Terminal settings.json file. Add the following to the defaults profile.
1
2
3
4
5
6
7
8
9
10
11
12

{
    "profiles":
    {
        "defaults":
        {
            "font":
            {
                "face": "MesloLGM Nerd Font"
            }
        }
    }
}
Initializing Oh-My-Posh
In Windows Terminal, with the PowerShell prompt loaded, you will need to edit your $PROFILE file. You can do this by running the following command.
1

notepad $PROFILE
Add the following lines to the $PROFILE file.
1

oh-my-posh init pwsh | Invoke-Expression
This will initialize Oh-My-Posh with the default theme.
Save the file and either restart the terminal or run the following command to reload the profile.
1

. $PROFILE
Customizing the Prompt
There are many ways to customize the prompt. You can change the theme, add segments, or create your own theme. You can find more information on the customizing Oh-My-Posh in their documentation. I’ll show you the customizations I made to my prompt. Once done, your prompt will look like this.
First step is to choose a theme. Themes in Oh-My-Posh are more then just colors, they include segments, which are the different parts of the prompt. I chose the PowerLevel10k Modern theme. You can set the theme by editing your oh-my-posh initialization command in your $PROFILE file.
1

oh-my-posh --init --shell pwsh --config "$env:POSH_THEMES_PATH\powerlevel10k_modern.omp.json" | Invoke-Expression
This will load the theme from the powerlevel10k_modern.omp.json file. You can find the theme files in the %POSH_THEMES_PATH% folder. This is likely in the following folder: C:\Users\<username>\AppData\Local\Programs\oh-my-posh\themes directory. There are many themes to choose from, and you can create your own.

Note: You will not see the main portion of the prompt unless you install the posh-git module. I’ll show you how to do that later.
If you want to customize the theme, you can create your own theme file. You can find more information in the Oh-My-Posh configuration documentation.
Add Additional PowerShell Modules
You can add additional PowerShell modules to your prompt to further customize it. I added the posh-git, PSReadLine, and Terminal-Icons modules to my prompt.
Posh-Git Module
Posh-git provides prompt with Git status summary information and tab completion for Git commands, parameters, remotes and branch names.
You can install it as a PowerShell module. In your terminal, run the following command.
1

Install-Module posh-git -Scope CurrentUser
After installed, open your $PROFILE file and add the following line after your oh-my-posh initialization.
1

Import-Module posh-git
PSReadLine Module
PSReadLine enhances the PowerShell command line editing environment. It provides syntax coloring, multi-line editing, and more.
You can install it as a PowerShell module. In your terminal, run the following command.
1

Install-Module PSReadLine -Scope CurrentUser
After installed, open your $PROFILE file and add the following line after your oh-my-posh initialization.
1

Import-Module PSReadLine
I also added the following lines to my $PROFILE file to customize the PSReadLine module after all of the imports.
1
2
3
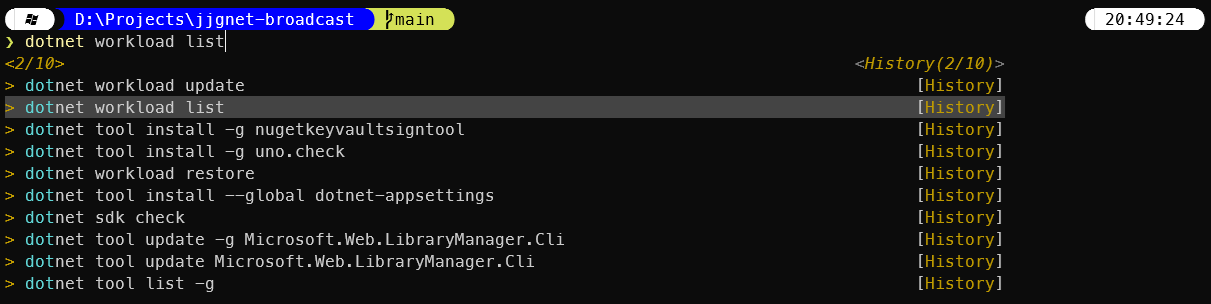
Set-PSReadLineOption -PredictionSource History
Set-PSReadLineOption -PredictionViewStyle ListView
Set-PSReadLineOption -EditMode Windows
| Option | Description |
|---|---|
| PredictionSource | The source of the prediction data. In this case, it is the history. |
| PredictionViewStyle | The style of the prediction view. In this case, it is a list view. |
| EditMode | The edit mode. In this case, it is Windows. |
With these options, you can use the up and down arrow keys to cycle through your command history. As shown in the image below.
Check out the Set-PSReadLineOption documentation for more options.
Terminal-Icons Module
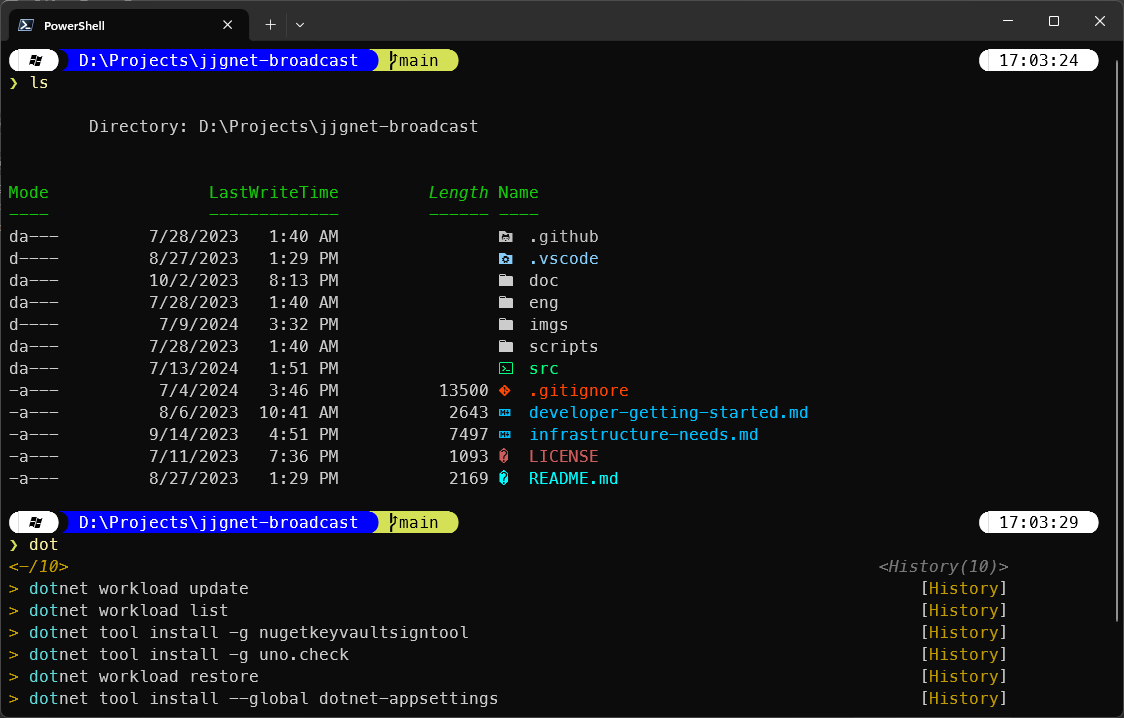
Terminal Icons that adds file and folder icons when displaying items in the terminal.
You can install it as a PowerShell module. In your terminal, run the following command.
1

Install-Module Terminal-Icons -Scope CurrentUser
After installed, open your $PROFILE file and add the following line after your oh-my-posh initialization.
1

Import-Module Terminal-Icons
After installing and importing the modules, your prompt will look like this when executing a dir command.
![]()
Complete $PROFILE File
Here is what my $PROFILE file looks like, with respect to the oh-my-posh configuration, after adding all of the modules.
1
2
3
4
5
6
7

oh-my-posh --init --shell pwsh --config "$env:POSH_THEMES_PATH\powerlevel10k_modern.omp.json" | Invoke-Expression
Import-Module posh-git
Import-Module PSReadLine
Import-Module Terminal-Icons
Set-PSReadLineOption -PredictionSource History
Set-PSReadLineOption -PredictionViewStyle ListView
Set-PSReadLineOption -EditMode Windows
Wrap up
Now you have a customized PowerShell prompt with Windows Terminal and Oh-My-Posh. You can customize the prompt further by creating your own theme or adding additional segments. You can also add additional PowerShell modules to enhance your command line experience.
References
Share on
Twitter Facebook LinkedIn RedditLike what you read?
Please consider sponsoring this blog.

